Tacoma Lift Kit and Tire Size by Height
Short answer
A leveling kit clears a 285/70R17 (a true 33) but does not create clearance at full compression. A 3 to 3.5 inch suspension lift with aftermarket upper control arms makes 33s comfortable, and 35s want 4 to 6 inches plus a regear - though a 4th-gen Tacoma fits 35s at about 3 inches with a reversible crash-plate delete.
How much lift do you need for each tire size?
There is no single lift number that unlocks a tire size, because the Tacoma runs independent front suspension (IFS): the tire and the fender move together through the travel, so lift alone rarely stops a tire from rubbing at full compression. Lift buys you static clearance and a taller stance, while trimming does the real work of clearing a bigger tire when the suspension stuffs. The two levers you actually pull are ride height and how much you are willing to cut - and your generation changes both answers.
| Lift tier | 3rd gen (2016-2023) | 4th gen (2024+) | Key supporting mods |
|---|---|---|---|
| Stock, no lift | Up to ~265/70R17 (~31.6 in) | Up to ~265/65R18 (~31.6 in); some 33s with trim | Mud-flap removal at most |
| Leveling kit (~1.5-2 in) | 285/70R17 (33) with liner trim, often a cab-mount chop | 285/70R17 (33) near bolt-on | Fender-liner trim, mud flaps, alignment |
| 2.5-3.5 in suspension lift + UCAs | Comfortable 285/70R17 (33); 34s with more trim | 33s clean; 35s become workable | Aftermarket UCAs, alignment, some liner and pinch-weld trim |
| 4-6 in lift (35s) | 315/70R17 / 35x12.50R17 (~34.4 in) with cab-mount and body-mount chop, plus regear | 35s at ~3 in with a reversible crash-plate delete; no cab-mount chop | Regear, UCAs, trimming or crash-plate delete, alignment |
Offset and wheel width move the line
A lower-offset or wider wheel pushes the tire out and up into the liner sooner, so the same tire that clears on a stock-offset wheel can rub on an aggressive one. Confirm your exact size against owner photos on your generation, trim, and wheel offset before you buy.
What is the least lift each popular size needs?
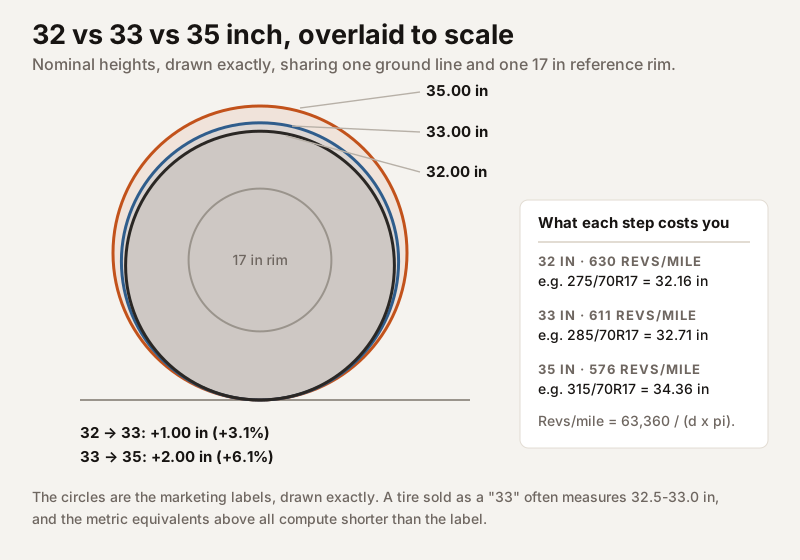
The table above reads lift-first: pick a height, see what fits. Most people arrive with the opposite question - they have a size in mind and want to know the cheapest suspension that gets them there. This table answers that direction, and it answers it conservatively. Two repo sources rate fitment here: a per-generation clearance matrix that gives each generation a modeled ceiling at each tier, and a per-size candidate table that gives each size a minimum setup and a minimum amount of clearance work. Where they disagree, the stricter of the two is what gets published.
| Target size | Diameter | 2nd gen | 3rd gen | 4th gen | Clearance work |
|---|---|---|---|---|---|
| 265/75R16 | 31.65 in | Leveling kit | Stock height | Stock height | No trimming |
| 275/70R17 | 32.16 in | 3 in lift | Leveling kit | Stock height | Minor changes |
| 285/70R17 | 32.71 in | 3 in lift | 3 in lift | Leveling kit | Minor changes |
| 285/65R18 | 32.59 in | 3 in lift | 3 in lift | Leveling kit | Minor changes |
| 275/70R18 | 33.16 in | Past every modeled tier | 4-6 in lift | Leveling kit | Minor changes |
| 33x12.50R17 | 33.00 in | Past every modeled tier | 4-6 in lift | 3 in lift | Trim as needed |
| 295/70R17 | 33.26 in | Past every modeled tier | 4-6 in lift | 3 in lift | Trim as needed |
| 285/70R18 | 33.71 in | Past every modeled tier | 4-6 in lift | 3 in lift | Trim as needed |
| 285/75R17 | 33.83 in | Past every modeled tier | 4-6 in lift | 3 in lift | Trim as needed |
| 315/70R17 | 34.36 in | Past every modeled tier | 4-6 in lift | 3 in lift | Not rated by the candidate table |
| 35x12.50R17 | 35.00 in | Past every modeled tier | 4-6 in lift | 4-6 in lift | Major clearance |
Read down the 4th-gen column and the whole generation gap becomes a single sentence: nearly every size that needs a 4-6 inch lift on a 3rd gen needs a 3-inch lift on a 4th gen, and nearly every size that needs a lift on a 3rd gen needs only a level on a 4th. You are buying roughly one rung of suspension back. Read across the 275/70R17 row and you get the cheapest illustration of it - the same tire is a stock-height fit on a 4th gen, a leveling-kit fit on a 3rd, and a 3-inch-lift fit on a 2nd.
Conservative on purpose, and stricter than the forums
This table will look pessimistic next to owner build threads, and it is meant to. Owners fit 285/70R17 on leveled 3rd gens constantly - with trimming, and often with a cab-mount chop. The model refuses to call a trimming job a fit, so it publishes the suspension tier at which the size clears on the modeled geometry instead. Use the table as the safe floor and the build threads as evidence of what is possible above it.
Width is missing from this table on purpose
Every rung here is set by diameter, because that is what the clearance matrix models. Width is the other half and often the deciding half: a 12.50-inch flotation tire and a 10.04-inch tall-skinny tire can share a diameter and behave nothing alike at full lock. The clearance-work column is where width shows up - that is why the widest sizes carry 'trim as needed' at every tier.
Can a leveling kit fit bigger tires, or do you need a real lift?
A leveling kit raises the front about 1.5 to 2 inches to remove the factory rake, so the truck sits flat and gains a little static gap between the tire and the fender. That is enough to make a 285/70R17 (a true 33 at about 32.7 inches) look right and clear while parked and driving straight. What a level does not do on an IFS truck is create clearance at full compression: when the suspension compresses over a bump or at full lock, the tire still travels up toward the same fender liner and cab mount it always did, because the strut sits higher but the travel window is unchanged.
- What a level buys you: a flatter stance, more static tire-to-fender gap, and an easy path to a 285/70R17 on a 4th-gen truck (near bolt-on) or on a lightly trimmed 3rd-gen truck.
- What it does not buy you: extra clearance when the suspension is fully stuffed - so 33s on a leveled 3rd gen still commonly need mud-flap removal and fender-liner trimming, and sometimes a cab-mount chop, to stop rub at full lock.
- It also does not add ground clearance under the axle the way a full suspension lift does, and it slightly steepens the front CV angle.
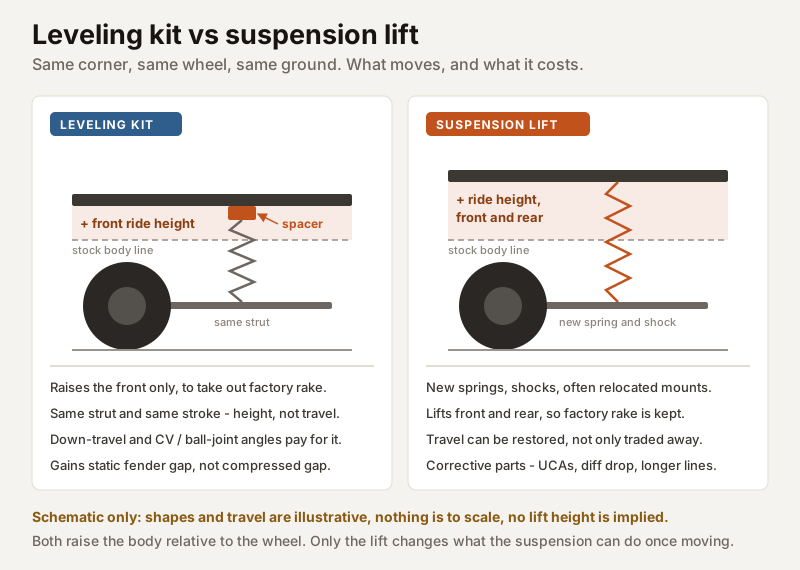
The practical takeaway: a leveling kit is a fine, low-cost way to run a 33 if you are ready to trim, but it is not a substitute for a taller coilover or spacer lift when you want a genuine ride-height increase, more droop for off-road, or the room for a 35.
The modeled numbers back that up, and they are smaller than the marketing suggests. Moving from stock height to a leveling kit raises our modeled tire ceiling by about 0.6 inches on a 3rd gen and 1.3 inches on a 4th gen - roughly one size step, not one size class. Adding a full 3-inch suspension lift on top of the level buys another 0.5 inches on a 3rd gen and another 1.0 on a 4th. In other words, going the whole way from factory height to a 3-inch lift on a 3rd gen is modeled to be worth about 1.1 inches of tire - exactly the gap between a 265/70R17 and a 285/70R17.
Suspension lift vs body lift on a Tacoma's IFS - which does what?
The two lifts do very different jobs, and only one of them meaningfully helps tire fitment on a Tacoma. A suspension lift (spacers, or replacement coilovers and a rear block or new leaf pack) raises the frame off the axle and lower control arms, so a 3-inch suspension lift nets roughly 3 inches of ground clearance and repositions the whole suspension. A body lift instead spaces the cab and bed up off the frame with pucks; it raises the sheet metal but leaves the frame, axles, and suspension where they were, so it adds essentially no ground clearance.
Body lifts are common on solid-axle trucks to squeeze tire room, but they are uncommon and rarely recommended on the Tacoma. They do open up a little space between the tire and the body, but they leave a visible gap at the frame, need bumper and steering fixes, and do nothing for the IFS geometry that actually limits tire travel. For almost every Tacoma build, a suspension lift or leveling kit is the right tool, and trimming handles what lift cannot.
IFS reality check
On the Tacoma's independent front suspension the fender and tire compress toward each other. Lift changes where the tire sits at rest, not how far it stops short of the fender at full bump. That is why trimming - not more lift - is what ultimately clears an aggressive tire.
Do you need upper control arms, alignment, and new CV angles?
Once you go past roughly 2.5 inches of front lift, aftermarket upper control arms (UCAs) move from optional to strongly recommended. Stock UCAs run out of adjustment for caster and camber at that height and can contact the coil or bind at droop; a good UCA restores proper alignment angles, adds droop clearance, and usually upgrades the ball joint. Budget for a quality set plus an alignment after any suspension change - skipping the alignment leads to fast, uneven tire wear.
- Caster and camber: lift pulls the front geometry out of spec; UCAs bring caster back for stable steering and let a shop set camber correctly.
- CV axle angle: lifting the front steepens the CV joint angle, which can add vibration and wear over time. Small lifts are usually fine; taller lifts benefit from a differential drop or CV-friendly design.
- Droop and contact: at full extension a lifted strut can let the coil or arm hit the stock UCA - another reason the aftermarket arm earns its place above ~2.5 inches.
Warranty is protected, not bulletproof
The Magnuson-Moss Warranty Act means a dealer cannot void your whole warranty just for installing a lift or larger tires. But they can deny a specific claim if they show the modification caused the failure - a steep CV angle that grenades an axle, for example. Keep it sane, keep records, and use quality parts.
What comes with each inch, beyond the springs?
A lift kit is rarely the whole parts list. Each band of height pulls in a different set of supporting parts, and knowing which band you are entering is how you avoid the classic sequence of buying a kit, fitting it, and then discovering the truck needs three more things before it drives properly. Here is what tends to arrive with each band.
| Front lift | Usually needed | Often needed | Rear side of the truck | Budget for |
|---|---|---|---|---|
| Level, 1-2 in | Alignment | Mud-flap removal; fender-liner trim if you also upsize the tire | Usually nothing - the point is to remove factory rake | Kit parts, plus install and an alignment if a shop fits it |
| 2-2.5 in | Alignment; check CV angle | Aftermarket UCAs at the top of this band; extended bump stops | Add-a-leaf or a small block to keep the stance level | Lift kit parts, plus the rear parts to match, install, and an alignment |
| 2.5-3.5 in | Aftermarket UCAs; alignment | Differential drop or CV-friendly geometry; longer brake lines and sway-bar end links; rear shocks matched to the new travel | New leaf pack or block plus matched shocks | Lift kit parts plus UCAs, the rear pack and shocks, install, and an alignment |
| 4-6 in | UCAs; alignment; driveline angle correction | Regear; carrier bearing or driveshaft work; steering-geometry correction; trimming or a crash-plate delete for the tire | Full rear pack or long-travel setup | The lift, plus a front-and-rear regear - the largest single line on this list |
Two thresholds inside that table matter more than the rest. The first is about 2.5 inches of front lift, where stock upper control arms run out of caster and camber adjustment and start binding at droop - past that point UCAs stop being a performance upgrade and start being the part that makes the alignment possible at all. The second is wherever your build crosses into a tire the drivetrain notices, which on a 3rd gen is usually a 35 and on a 4th gen is usually later, because the 4th gen starts on a taller factory tire.
Budget the alignment into every tier
An alignment belongs on every row of that table, including the leveling kit. Changing ride height changes caster and camber whether or not the kit's instructions mention it, and skipping the alignment is the cheapest way to destroy an expensive new set of tires.
How does the 4th gen make 35s easier?
The 2024+ 4th-gen Tacoma is markedly friendlier to 35s than the 3rd gen. Its wheel opening is more forgiving, and the frame is laid out so that the main obstacle up front is a bolt-on crash bracket (crash plate), not the cab mount. On a 4th gen, roughly a 3-inch lift plus a crash-plate delete is enough to run 35s without any permanent frame cutting. The crash plates come off with two bolts per side, free up several inches of clearance, and can be reinstalled at any time - a fully reversible modification.
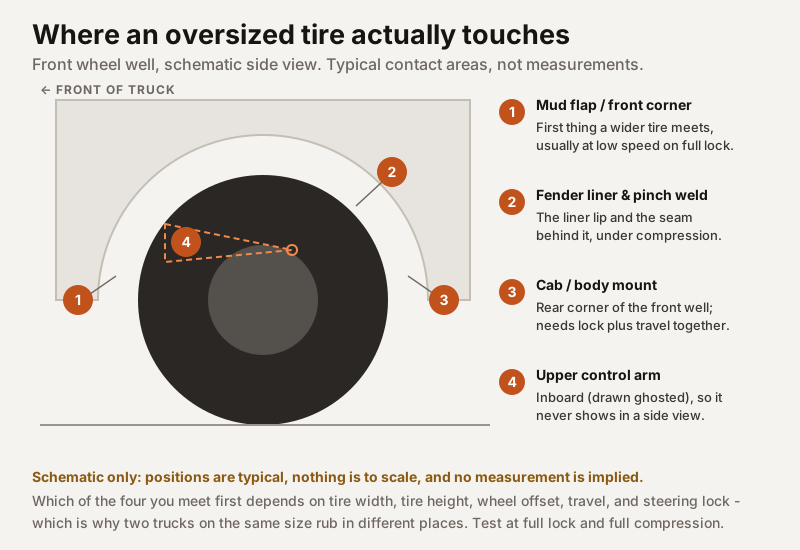
The 3rd gen is a bigger project for the same tire. A 35 (315/70R17, sold as 35x12.50R17, about 34.4 inches) typically wants 4 to 6 inches of lift and permanent metalwork: a cab-mount chop (CMC), and often a body-mount chop (BMC), on top of liner and pinch-weld trimming. That is irreversible cutting, so it is worth being sure about the build before you commit. In short, 4th-gen 35s lean on reversible parts and lift; 3rd-gen 35s lean on lift plus the saw.
The trimming ladder
Owners generally cut in this order as the tire gets bigger: mud flaps, then fender liner, then the pinch weld (rolled or trimmed), then the cab mount (CMC), and finally the body mount (BMC). A 4th-gen 35 setup can often stop at a crash-plate delete instead of a cab-mount chop.
What does a lift and bigger tires cost, and when do you regear?
This site does not publish prices - they swing with parts quality, region, and whether you install yourself, and a stale figure is worse than none. What is stable is the ORDER of the bill, and that is what to plan against: a leveling kit is the cheapest entry, a full coilover lift with UCAs and an alignment is a step up from it, and a true 35 build with a regear is the largest of the three by a wide margin.
- Leveling kit: kit parts, plus install and an alignment if a shop fits it. The cheapest way into a taller stance.
- 2-3 in suspension lift (spacers or coilovers): kit parts, install, and an alignment - a clear step up from a level, and more again for coilovers over spacers.
- Aftermarket UCAs: a set of arms plus the alignment they exist to make possible. Required above roughly 2.5 inches, so they belong in the lift budget rather than beside it.
- Front and rear regear: both axles together, gears plus install labour. The largest line here by some margin.
- 35-inch tires and wheels: varies widely by brand and size, on top of the above.
On gearing, bigger tires act like taller (numerically lower) axle ratios and sap acceleration and towing. A jump to 33s is usually livable without a regear, though a mild 4.56 or 4.88 helps if you tow or run a heavy tire. At 35s a regear is strongly recommended - commonly 4.88, or 5.29 for the biggest tires and heaviest use - to recover drivability. Run your tire diameter and stock ratio through a gear-ratio calculator to see the effective ratio and pick a target.
Match the ratio to the tire and the use
A 3rd-gen V6 auto is about 3.909 stock; the 4th gen 8-speed is about 3.583. 33s often pair with 4.56 (mild) or 4.88; 35s with 4.88 or 5.29. Regear the front and rear together - it is one job on two axles, and the biggest line in a lift budget.
Frequently asked questions
Not strictly. A 285/70R17 (33) fits a leveled or lightly trimmed truck on both generations - near bolt-on on a 4th gen, and with fender-liner trimming (and sometimes a cab-mount chop) on a 3rd gen. A 2.5 to 3.5 inch lift with upper control arms makes 33s comfortable and quiet at full lock, but it is not mandatory to fit them.
On a 4th gen, often yes - a 285/70R17 is close to bolt-on. On a 3rd gen, usually no: a leveling kit adds static clearance but not clearance at full compression, so a 33 still tends to rub the fender liner and cab mount at full lock. Expect to remove the mud flaps and trim the liner, and possibly chop the cab mount.
For roughly 2.5 inches of front lift or more, aftermarket upper control arms are strongly recommended. Stock arms run out of caster and camber adjustment at that height and can bind at droop. Good UCAs restore alignment, add droop clearance, and usually upgrade the ball joint. Budget for the arms plus an alignment afterward.
Yes. The 4th-gen frame lets you run 35s with about a 3-inch lift and a crash-plate (crash bracket) delete, which is fully reversible - two bolts per side and no frame cutting. That avoids the permanent cab-mount chop a 3rd gen typically needs for 35s. Always confirm your exact tire, wheel offset, and lift at full lock and compression.
We do not publish figures for it, because this site tracks no parts or labour prices and a stale number is worse than none. What we can give you is the shape of the bill and its order. A leveling kit is the cheapest entry: kit parts, install, alignment. A 2-3 inch lift adds the kit itself, the rear parts to match, and UCAs above about 2.5 inches. A full 35-inch build adds a front-and-rear regear, which is the largest single line, before wheels and tires. Price each line with your own local quotes - our cost guide explains the method.
For 33s, usually not - most owners live with the small loss, though a mild 4.56 or 4.88 helps if you tow. For 35s, a regear is strongly recommended (commonly 4.88, or 5.29 for the biggest tires) to recover acceleration and towing. You regear the front and rear together to keep the ratios matched.
Less than the height suggests, because the Tacoma runs independent front suspension. Our modeled ceilings move by about 0.6 inches going from stock to a leveling kit on a 3rd gen, and another 0.5 inches going to a 3-inch lift - about 1.1 inches of tire for the whole journey. A 4th gen gains more, about 1.3 then another 1.0. Trimming, not ride height, is what adds clearance at full compression.
On our conservative model: a leveling kit on a 4th gen, and a 3-inch suspension lift on a 2nd or 3rd gen, all with minor clearance work on stock-style offset. That is stricter than owner practice - plenty of leveled 3rd gens run a 285/70R17 with fender-liner trimming and often a cab-mount chop. Treat the modeled tier as the safe floor and the build threads as evidence of what is possible above it.
Around 2.5 inches of front lift. Below that, stock arms usually still have enough caster and camber adjustment left for a shop to align the truck. Above it they run out of range and can bind at droop, so aftermarket UCAs stop being an upgrade and become the part that makes a correct alignment possible. Budget for the arms plus the alignment.
Our model puts 35x12.50R17 at the 4-6 inch tier even on a 4th gen, with major clearance work - which is deliberately more cautious than the common 4th-gen build, roughly 3 inches of lift plus a reversible crash-plate delete. The 4th-gen frame genuinely makes this easier than a 3rd gen, where the same tire wants a permanent cab-mount chop. Confirm against owner photos on your exact trim, offset, and lift.
A leveling kit is front-only by design - the whole point is to remove the factory rake so the truck sits flat. Anything past that band usually wants the rear raised to match, through an add-a-leaf, a block, or a new leaf pack, with rear shocks matched to the new travel. Otherwise you end up nose-high, which changes headlight aim, loaded ride height, and how the truck behaves with weight in the bed.
Keep going
Sources
- Toyota Tacoma specifications (toyota.com)
- This site's generation clearance matrix and per-size candidate table, for every modeled tier on this page
Compare your exact sizes
Run any size in this guide through the Tacoma tire calculator to see diameter, width, speedometer error, effective gearing, and highway RPM before you buy.